There are a number of activities you can perform with photos. You can edit their flaws, enhance them with special effects, organize them into photo albums and slide shows, use them in a variety of projects, or post them to the World Wide Web. But before anything can be done, you must get a photo into the program, or create a new image, or blank canvas, on which to draw.
To get existing photos into PhotoSuite II for editing purposes:
|
|
|
To add photos to a photo album:
|
|
|
|
|
|
|
|
|
|
|
To create new photos, or images:
![]() Click the New tool on the Command bar. The Command bar is located above the Work area.
Click the New tool on the Command bar. The Command bar is located above the Work area.
or
On the File menu, click New.
or
Press the CTRL+N keyboard combination.
In the New dialog displayed, specify the orientation, units of measure, dimensions, and resolution of the new image.
Click OK to close the dialog. A new, or blank image is displayed in the Work area.
New dialog
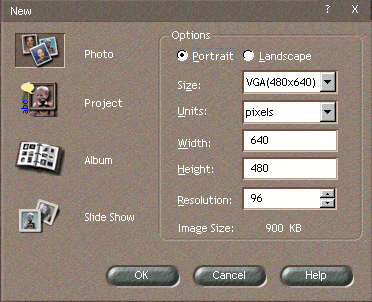
Options
|
Specify the orientation of the new image on the page. Choose between Portrait and Landscape. |
|
Specify the size of the new image. From the Size list, choose between several predefined sizes, or select Custom Size to specify your own. If you select Custom Size, specify the dimensions of the image in the Width and Height value fields. |
|
Specify the units of measure in which the dimensions of the new image are expressed. From the Units list, choose between pixels, inches, and centimeters. |
|
The width of the new image expressed in the selected units of measure. If you selected Custom Size above, specify the width of the new image in this field. If you selected a predefined size above, this field is filled automatically. |
|
The height of the new image expressed in the selected units of measure. If you selected Custom Size above, specify the height of the new image in this field. If you selected a predefined size above, this field is filled automatically. |
|
The resolution of the new image expressed in dots per inch. |
|
The estimated file size of the new image. |